Home > Blog > How to fix 100% disk usage issues and improve PC performance
How to fix 100% disk usage issues and improve PC performance
Most Window users may have encountered the issue that their disk usage shows 100% in task manager, which leads to the system lagging or slow response. This issue can be caused by the overloaded of the programs, and it will influence both the hard drives and the solid-state drives.
by Cindy | Jan 13, 2022
Most Window users may have encountered the issue that their disk usage shows 100% in task manager, which leads to the system lagging or slow response. This issue can be caused by the overloaded of the programs, and it will influence both the hard drives and the solid-state drives.
To fix the 100% disk usage issue, we are offering some useful tips in the following paragraphs. Please try the solutions accordingly to make your system run normally.
1. Restart the Program with High Disk Usage
In task manager, you can check what program is occupying too much disk space. Then you can simply click the related program and choose end task. After that, restart the program and see if it still leads to the 100% disk usage issue.
2. Disable SuperFetch Service
SuperFetch helps to decrease your boot time and make must-load programs more efficiently. However, it has been identified as a potential cause of disk performance issues on Windows 8 and later Windows versions, especially on Windows 10. Here, we are offering the steps to disable SuperFetch service to fix the 100% disk usage issues.
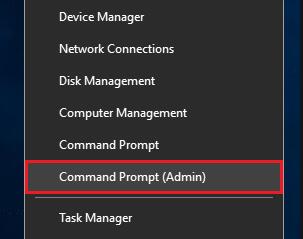
Step 1. Press Windows key and X together and choose Command Prompt (Admin);
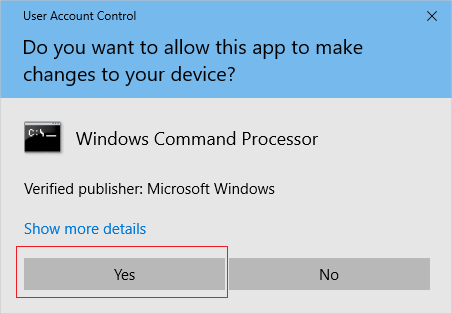
Step 2. Click YES at the User Account Control prompt;
Step 3. The command prompt will once again display. Type command: net.exe stop superfetch and hit enter;

Step 4. If the command above isn’t valid, try the other command: net.exe stop sysmain;
Step 5. Please wait for a few minutes to see if your computer starts to perform well. Simply check your computer’s disk usage by typing task manager in the Windows search bar and select Task Manager, then in the Processes tab, look at the % at the top of the Disk column. Or you can just right click the blank space of your task bar and choose task manager.
3. Check the Antivirus Software
If you've installed some antivirus or anti-malware programs on computer, you can temporarily disable them to see if they're the cause of your 100% disk usage problem. For some antivirus software sometimes, it can cause the system lagging issue.
Generally, you can just disable your antivirus software by right clicking its icon in the system tray. In the case we have mentioned above, you can disable it for just 10 minutes or less to check if the problem is fixed.
4. Fix the StorAHCI.sys driver
Microsoft support shows that the known cause of this issue is that some Advanced Host Controller Interface PCI-Express (AHCI PCIe) models cause these symptoms in Windows 10 when running with the inbox StorAHCI.sys driver.
Due to a firmware bug, the Solid-state drive (SSD) does not properly complete input/output when Message Signaled Interrupt (MSI) mode is enabled. As a result, the Windows storage stack attempts to reset the device after waiting on unresponsive read/write for a period of time.
If this is the case on your computer, please try the following steps to fix the 100% disk usage issue.
Step 1. Press Windows key and X together and choose device manager;
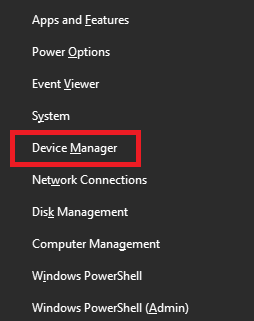
Step 2. Locate at IDE ATA/ATAPI Controllers and double-click the AHCI controller;
Step 3. Choose driver and click driver details. If you can see storahci.sys stored in a path of system32 folder, then you are running the inbox AHCI driver;
Step 4. Close the Driver Details window and go to Details tab. From the menu, select Device Instance Path. Make note of the path, starting from VEN_;
Step 5. Type regedit in the search box of Start panel, then hit Enter to run Registry Editor. Then go to:
HKEY_LOCAL_MACHINE\System\CurrentControlSet\Enum\PCI\ <AHCI Controller>\<Random Number>\Device Parameters\Interrupt Management\MessageSignaledInterruptProperties
Step 6. Double click the MSISupported key, change the value to 0 and hit ok.
All steps done, please restart your computer and check if the problem is fixed.
5. Change Google Chrome Settings
Some users send feedbacks that the chrome browser always causes this 100% disk utilization issue and they recommend changing the settings in Chrome.
Step 1. In Google Chrome, go to Settings;
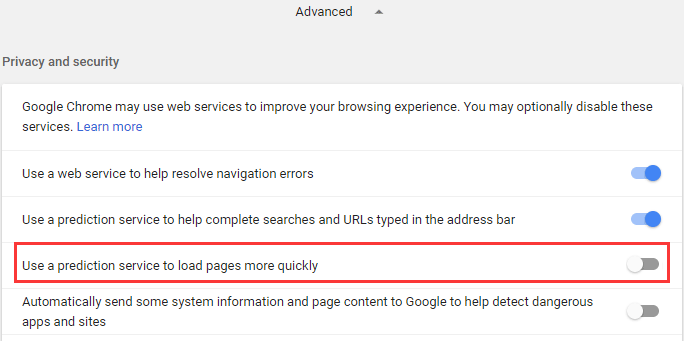
Step 2. Scroll down to the bottom of the page and click Advanced;
Step 3. In Privacy and security, make sure that you have turned off Use a prediction service to load pages more quickly. In addition, ensure that Continue running background apps when Google Chrome is closed is disabled in System settings.
6. Reset Virtual Memory
In computing, virtual memory is a memory management technique that provides an idealized abstraction of the storage resources that are actually available on a given machine, which creates the illusion to users of a very large memory.
Sometimes, when the RAM is not enough to perform a task, Windows system will temporarily store the files in virtual memory, then it will swap them back to RAM when required. Due to this, it can cause the 100% disk usage issue.
Step 1. Press Windows and Pause/Break keys together, then choose Advanced system settings;
Step 2. Go to the Advanced tab, and click Settings;
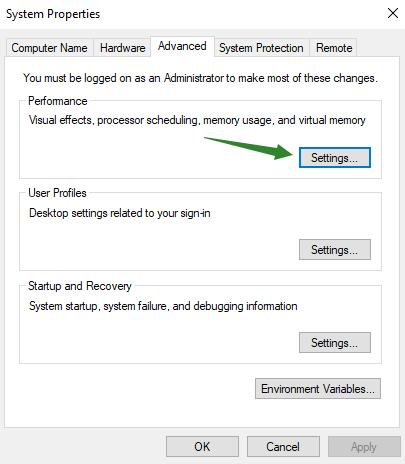
Step 3. Go to the Advanced tab, and choose Change… in the Virtual memory section;
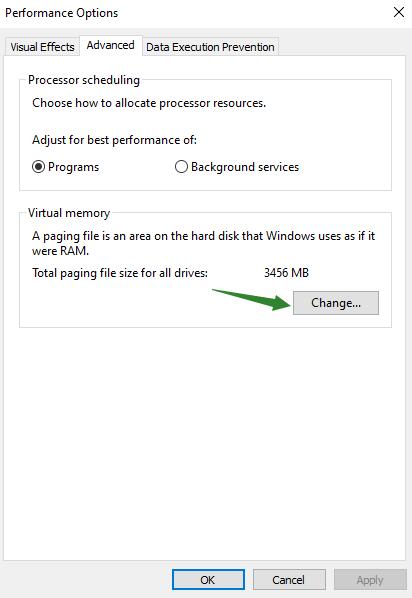
Step 4. Untick Automatically manage paging file size for all drives. Then highlight your system drive and customize the Initial size and Maximum size for your virtual memory. Finally, click Set, and then click OK to continue;
Step 5. Clear all your computer’s temp files. Press Windows key and R together, then type temp and hit Enter. This will invoke Windows Explorer with your Temp folder open, showing you all the temp files on your computer. Select all the files in the Temp folder and delete them.
All the solutions mentioned above are offered to fix 100% disk usage issues on Windows 10 and improve PC performance. You can choose the one you prefer to try. If you have any other suggestions, please send us your feedback and we will add it to this tip.
Related Tips & Guides
Hot Articles
- 4 Tips to Fix Nvidia Control Panel Missing Issues on Windows 10
- How to Fix PUBG Lag/Delay [PC Version]
- How to Fix AMD Radeon Graphics Cards Black Screen Issues
- How to Download and Use Logitech Gaming Software
- [Solved] How to Fix Nvidia Driver Crashing on Windows 10/8/7
- How to Update AMD/Nvidia/Intel Graphics Driver for Better Gaming Experience
- How to record gameplay on Windows
- How Much RAM Do I Need for PC Gaming
- How Does Reshade Affect Gaming PC Performance?
- About Smart Game Booster
- About US
- Online Feedback
- User Manual
- FAQs
© 2023 Smart Game Booster. All Rights Reserved
